Save IoT Hub messages that contain information like sensor data to Azure table storage

[!NOTE] Before you start this tutorial, make sure you’ve completed Setup your device. By Setup your device, you set up your IoT device and IoT hub, and deploy a sample application to run on your device. The application sends collected sensor data to your IoT hub.
What you will learn
You learn how to create an Azure storage account and an Azure Function App to store IoT Hub messages in Azure table storage.
What you will do
- Create an Azure storage account.
- Prepare for IoT Hub connection to read messages.
- Create and deploy an Azure Function App.
What you will need
- Tutorial Setup your device completed which covers the following requirements:
- An active Azure subscription.
- An Azure IoT hub under your subscription.
- A running application that sends messages to your Azure IoT hub.
Create an Azure storage account
- In the Azure portal, click New > Storage > Storage account.
Enter the necessary information for the storage acount:
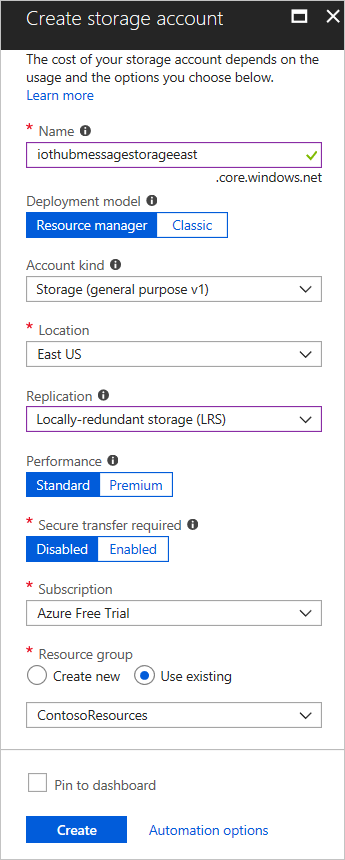
Name: The name of the storage account. The name must be globally unique.
Resource group: Use the same resource group that your IoT hub uses.
Pin to dashboard: Check this option for easy access to your IoT hub from the dashboard.
- Click Create.
Prepare for IoT Hub connection to read messages
IoT Hub exposes a built-in Event Hub-compatible endpoint to enable applications to read IoT Hub messages. Meanwhile, applications use consumer groups to read data from IoT Hub. Before creating an Azure Function App to read data from your IoT hub, you need to:
- Get the connection string of your IoT hub endpoint.
- Create a consumer group for your IoT hub.
Get the connection string of your IoT hub endpoint
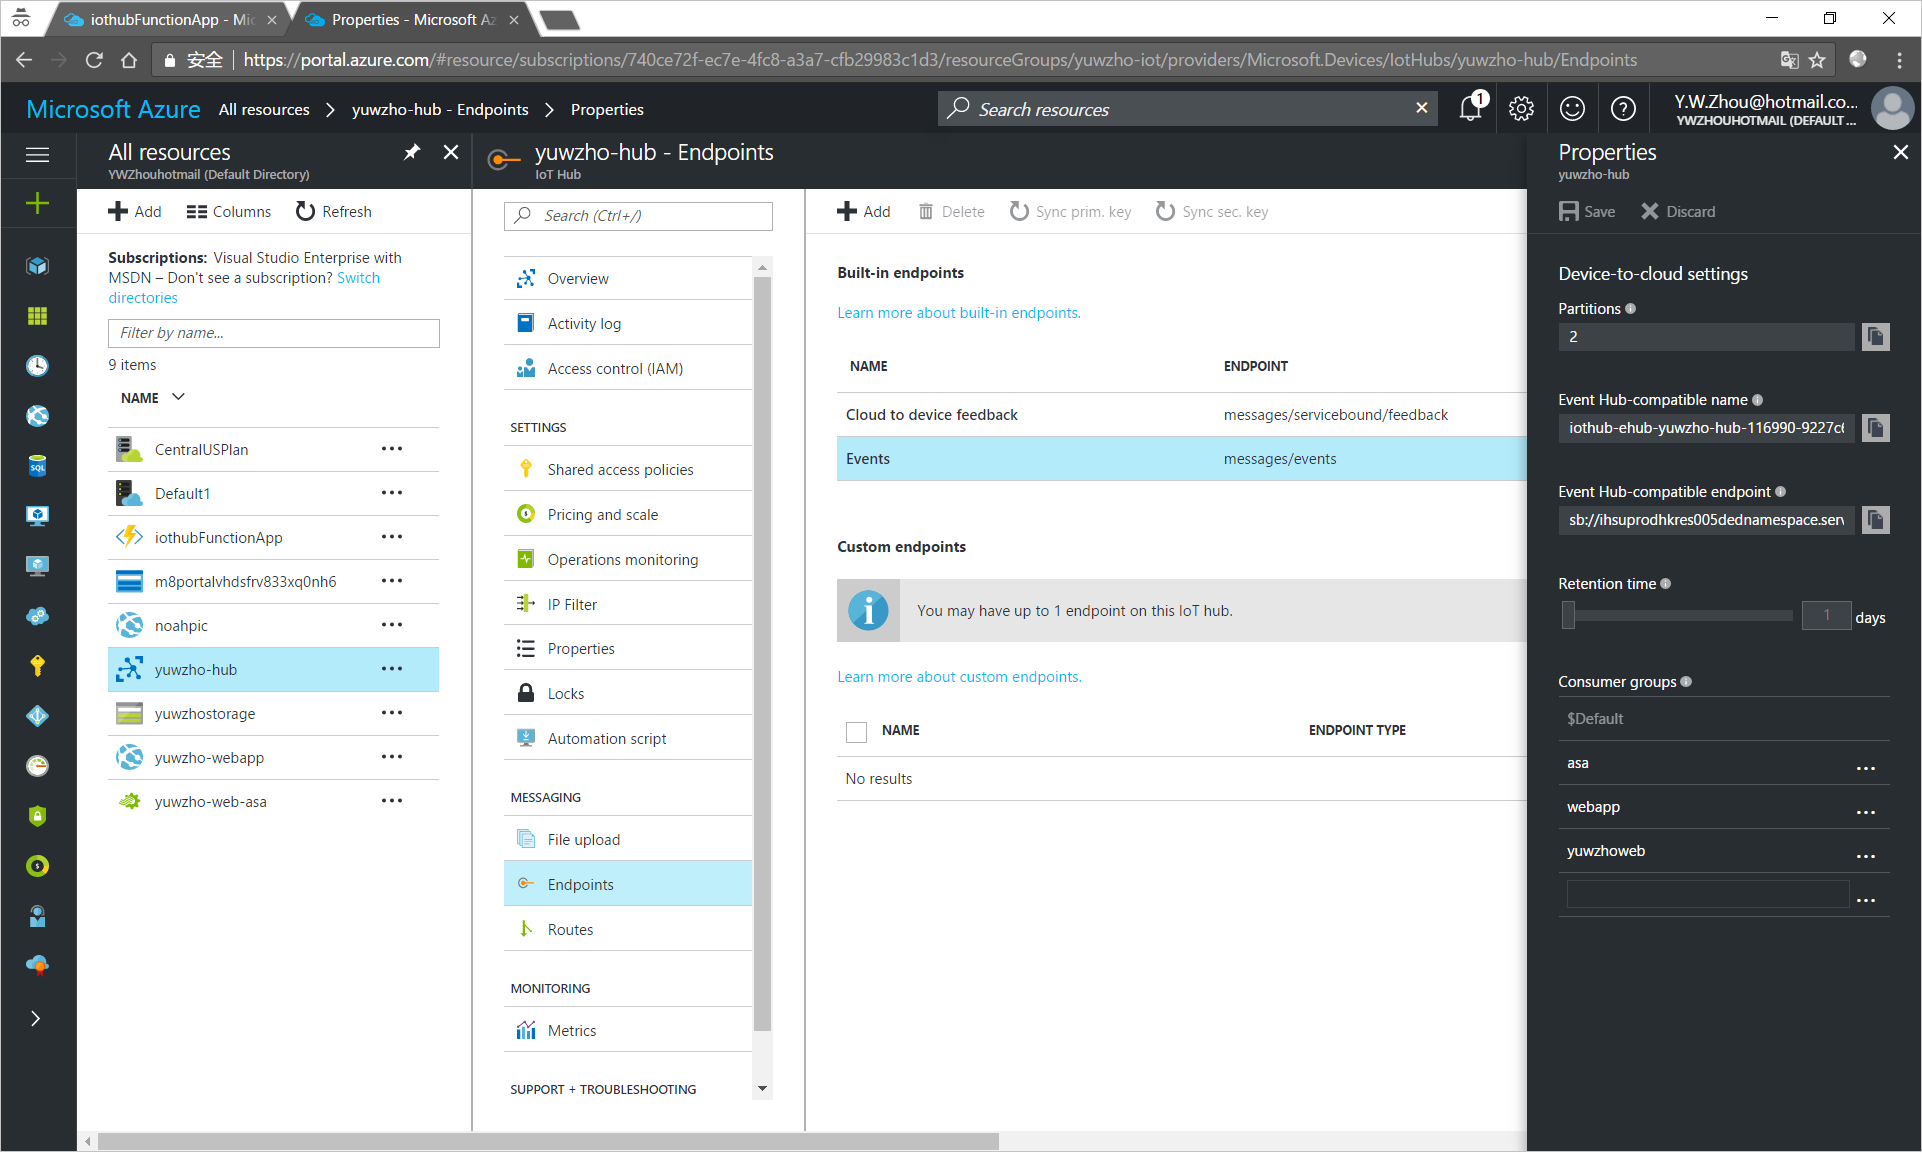
- Open your IoT hub.
- On the IoT Hub pane, click Endpoints under MESSAGING.
- On the right pane, click Events under Built-in endpoints.
In the Properties pane, make a note of the following values:
- Event Hub-compatible endpoint
- Event Hub-compatible name
On the IoT Hub pane, click Shared access policies under SETTINGS.
- Click iothubowner.
- Make a note of the Primary key value.
Make up the connection string of your IoT hub endpoint as follows:
Endpoint=<Event Hub-compatible endpoint>;SharedAccessKeyName=iothubowner;SharedAccessKey=<Primary key>[!Note] Replace
<Event Hub-compatible endpoint>and<Primary key>with the values you noted down.
Create a consumer group for your IoT hub
- Open your IoT hub.
- On the IoT Hub pane, click Endpoints under MESSAGING.
- On the right pane, click Events under Built-in endpoints.
- In the Properties pane, enter a name under Consumer groups and make a note of the name.
- Click Save.
Create and deploy an Azure Function App
- In the Azure portal, click New > Compute > Function App.
Enter the necessary information for the Function App.
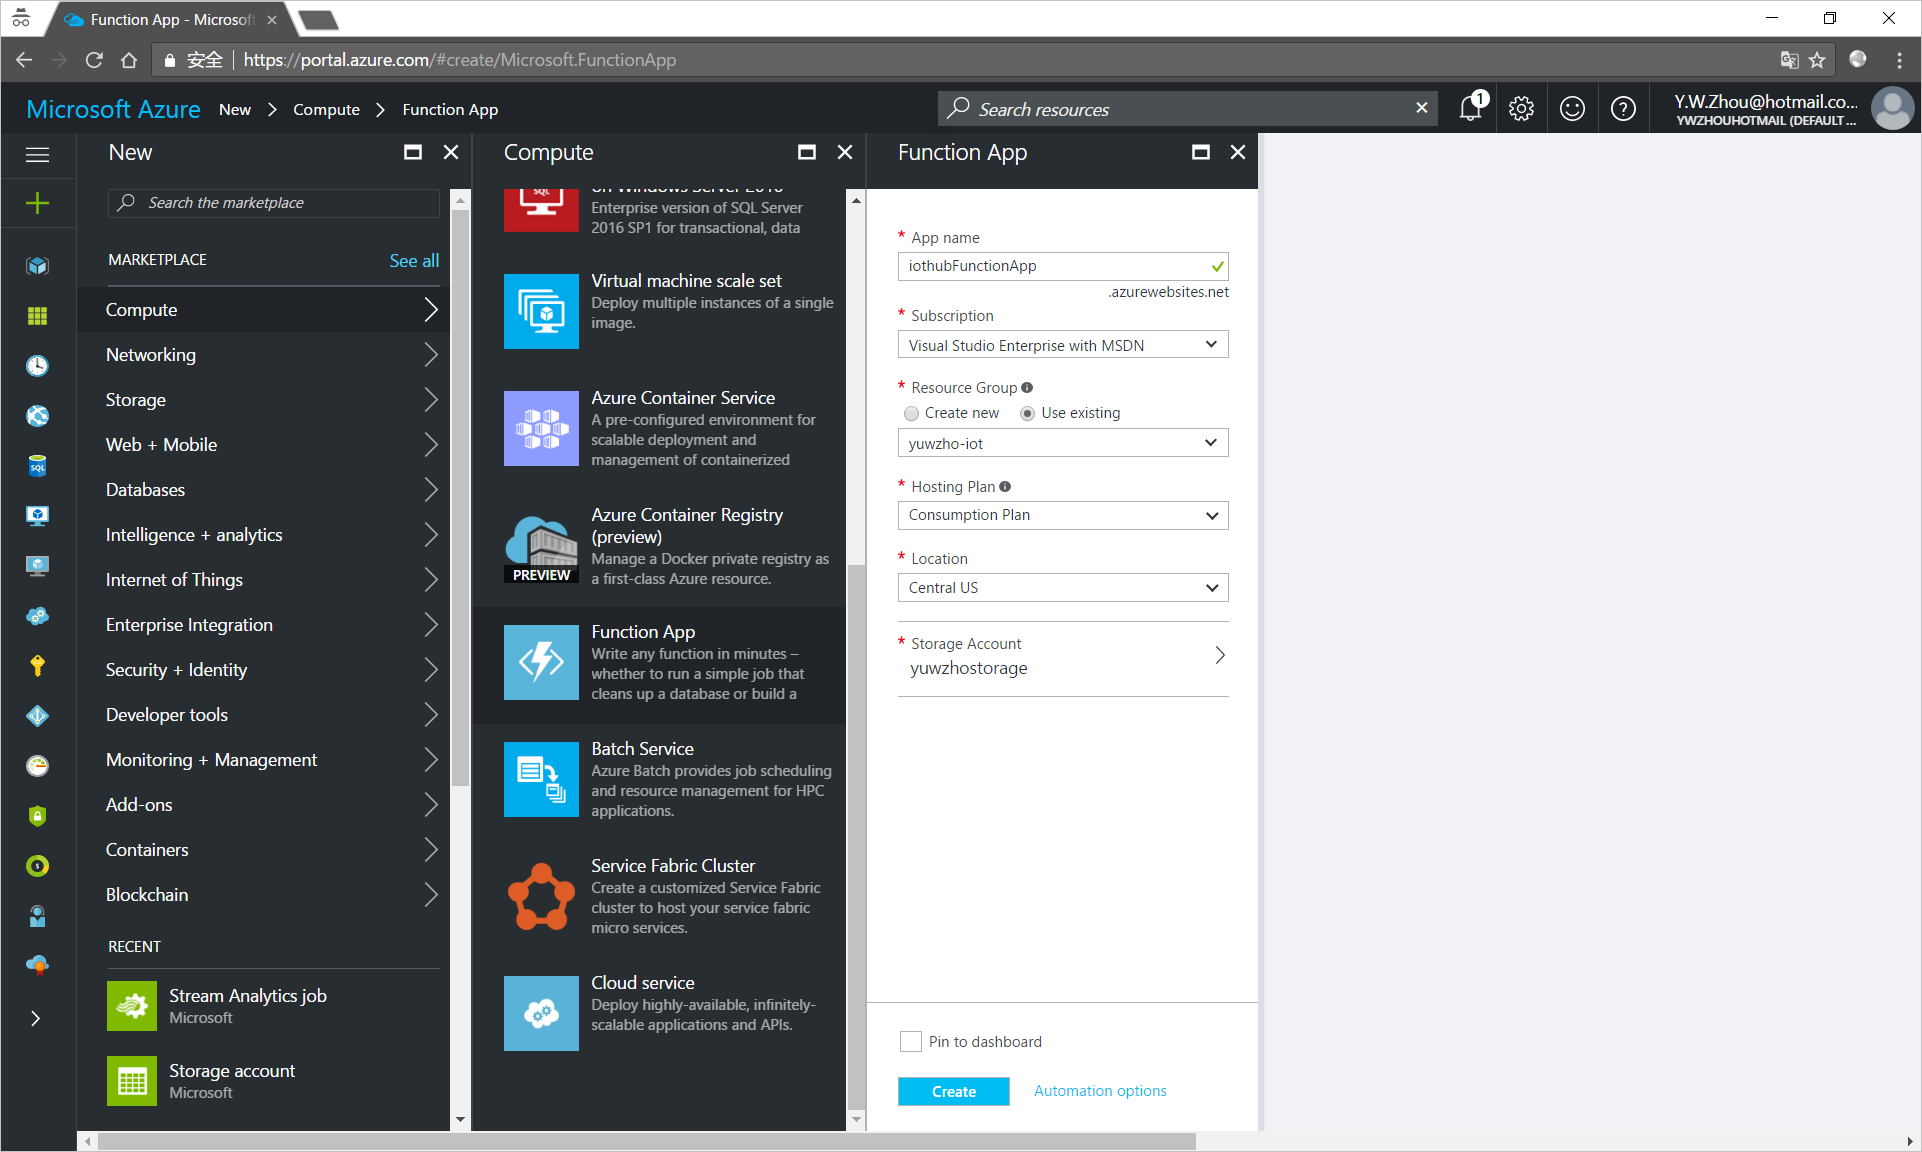
App name: The name of the Function App. The name must be globally unique.
Resource group: Use the same resource group that your IoT Hub uses.
Storage Account: The storage account that you created.
Pin to dashboard: Check this option for easy access to the Function App from the dashboard.
- Click Create.
- Open the Function App once it is created.
Create a new function in the Function App.
- Click New Function.
- Select JavaScript for Language, and Data Processing for Scenario.
- Click the EventHubTrigger-JavaScript template.
Enter the necessary information for the template.
Name your function: The name of the function.
Event Hub name: The Event Hub-compatible name you noted down.
Event Hub connection: Click new to add the connection string of your IoT hub endpoint that you made up.
- Click Create.
Configure an output of the function.
Click Integrate > New Output > Azure Table Storage > Select.
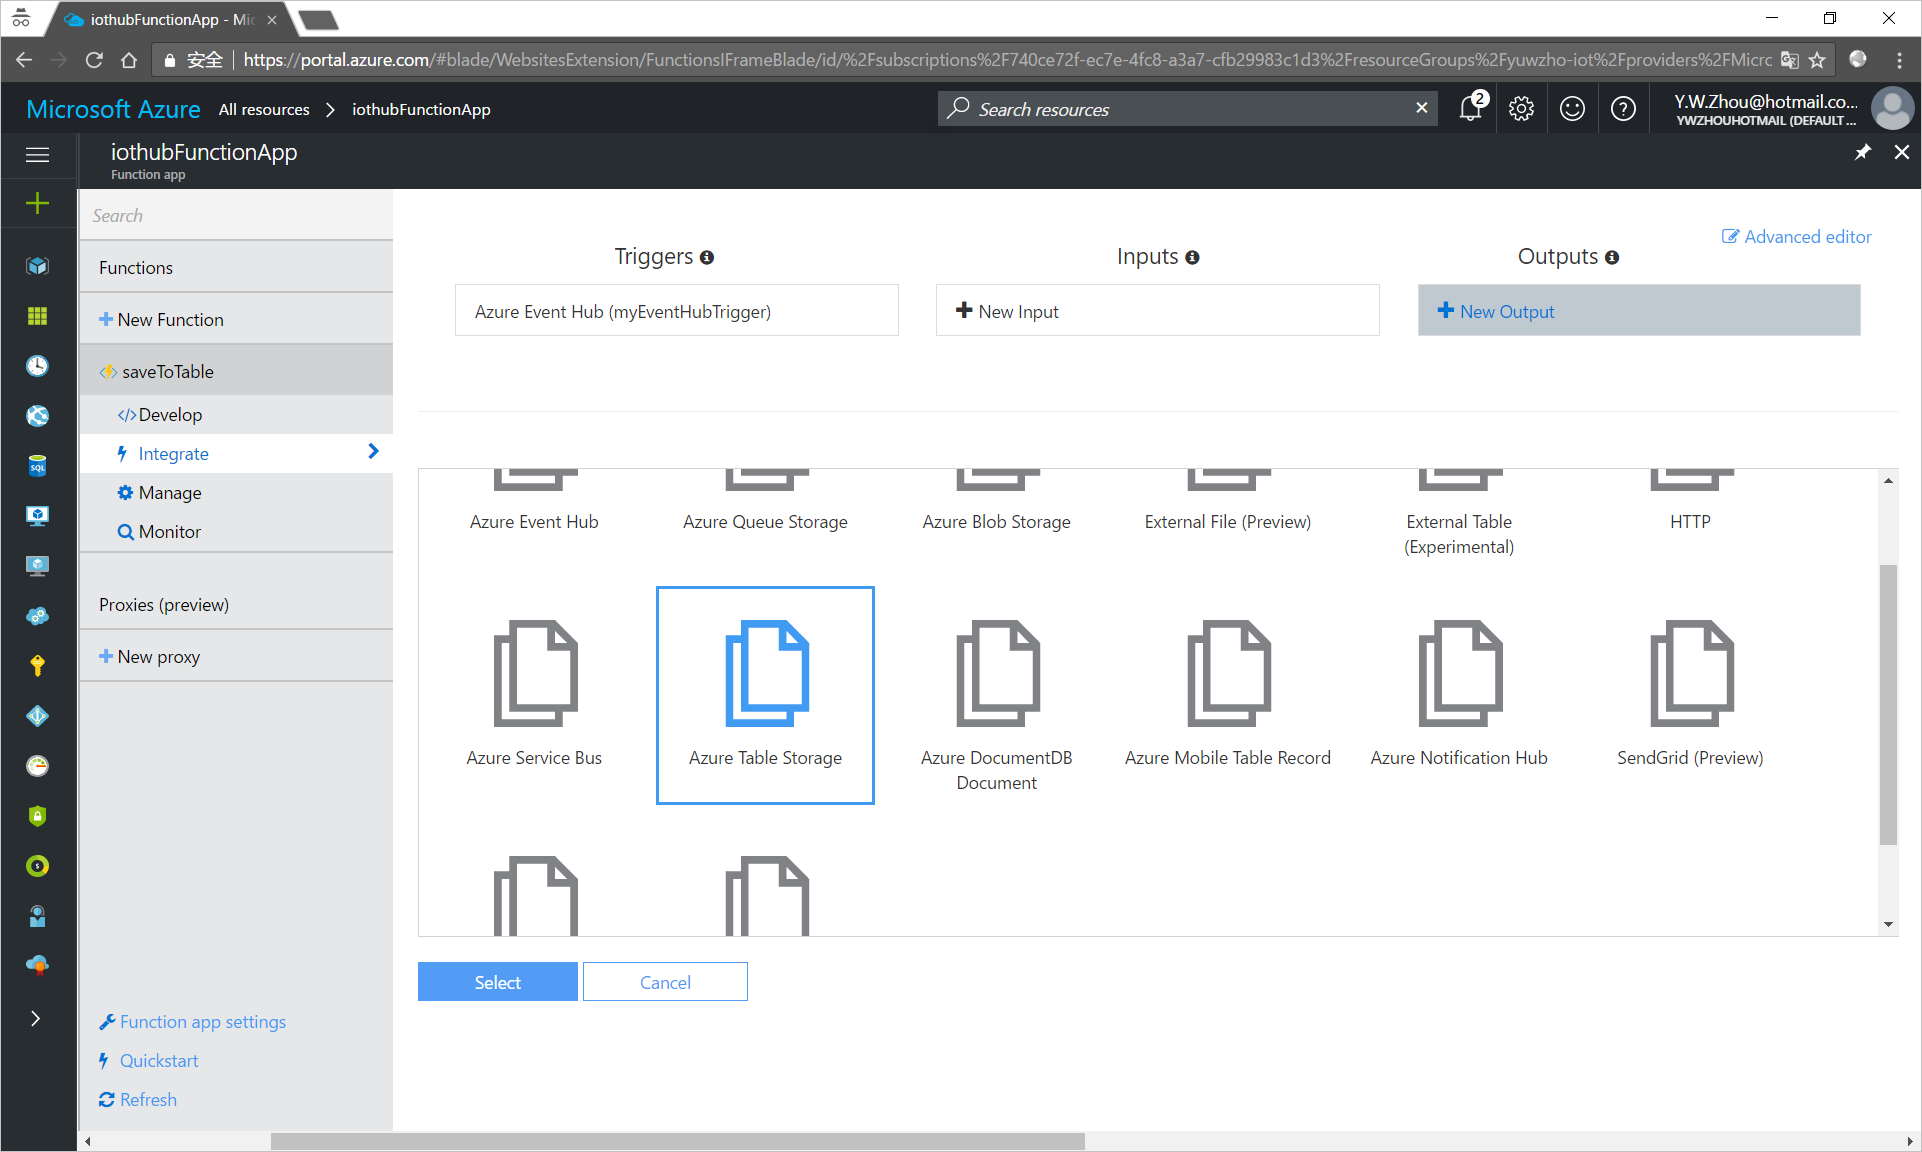
Enter the necessary information.
Table parameter name: Use
outputTablefor the name, which will be used in the Azure Functions' code.Table name: Use
deviceDatafor the name.Storage account connection: Click new and select or input your storage account.
- Click Save.
- Under Triggers, click Azure Event Hub (myEventHubTrigger).
- Under Event Hub consumer group, enter the name of the consumer group that you created, and then click Save.
- Click Develop, and then click View files.
Replace the code in
index.jswith the following, and then click Save.'use strict'; // This function is triggered each time a message is revieved in the IoTHub. // The message payload is persisted in an Azure Storage Table module.exports = function (context, iotHubMessage) { context.log('Message received: ' + JSON.stringify(iotHubMessage)); var date = Date.now(); var partitionKey = Math.floor(date / (24 * 60 * 60 * 1000)) + ''; var rowKey = date + ''; context.bindings.outputTable = { "partitionKey": partitionKey, "rowKey": rowKey, "message": JSON.stringify(iotHubMessage) }; context.done(); };
By now, you have created the Function App. It stores messages that your IoT hub receives in your Azure table storage.
[!Note] You can use the Run button to test the Function App. When you click Run, the test message is sent to your IoT hub. The arrival of the message should trigger the Function App to start and then save the message to your Azure table storage. The Logs pane records the details of the process.
Verify your message in your table storage
- Run the sample application on your device to send messages to your IoT hub.
- Download and install Microsoft Azure Storage Explorer.
- Open Microsoft Azure Storage Explorer, click Add an Azure Account > Sign in, and then sign in to your Azure account.
Click your Azure subscription > Storage Accounts > your storage account > Tables > deviceData.
You should see messages sent from your device to your IoT hub logged in the
deviceDatatable.
Next steps
You’ve successfully created your Azure storage account and Azure Function App to store messages that your IoT hub receives in your Azure table storage.