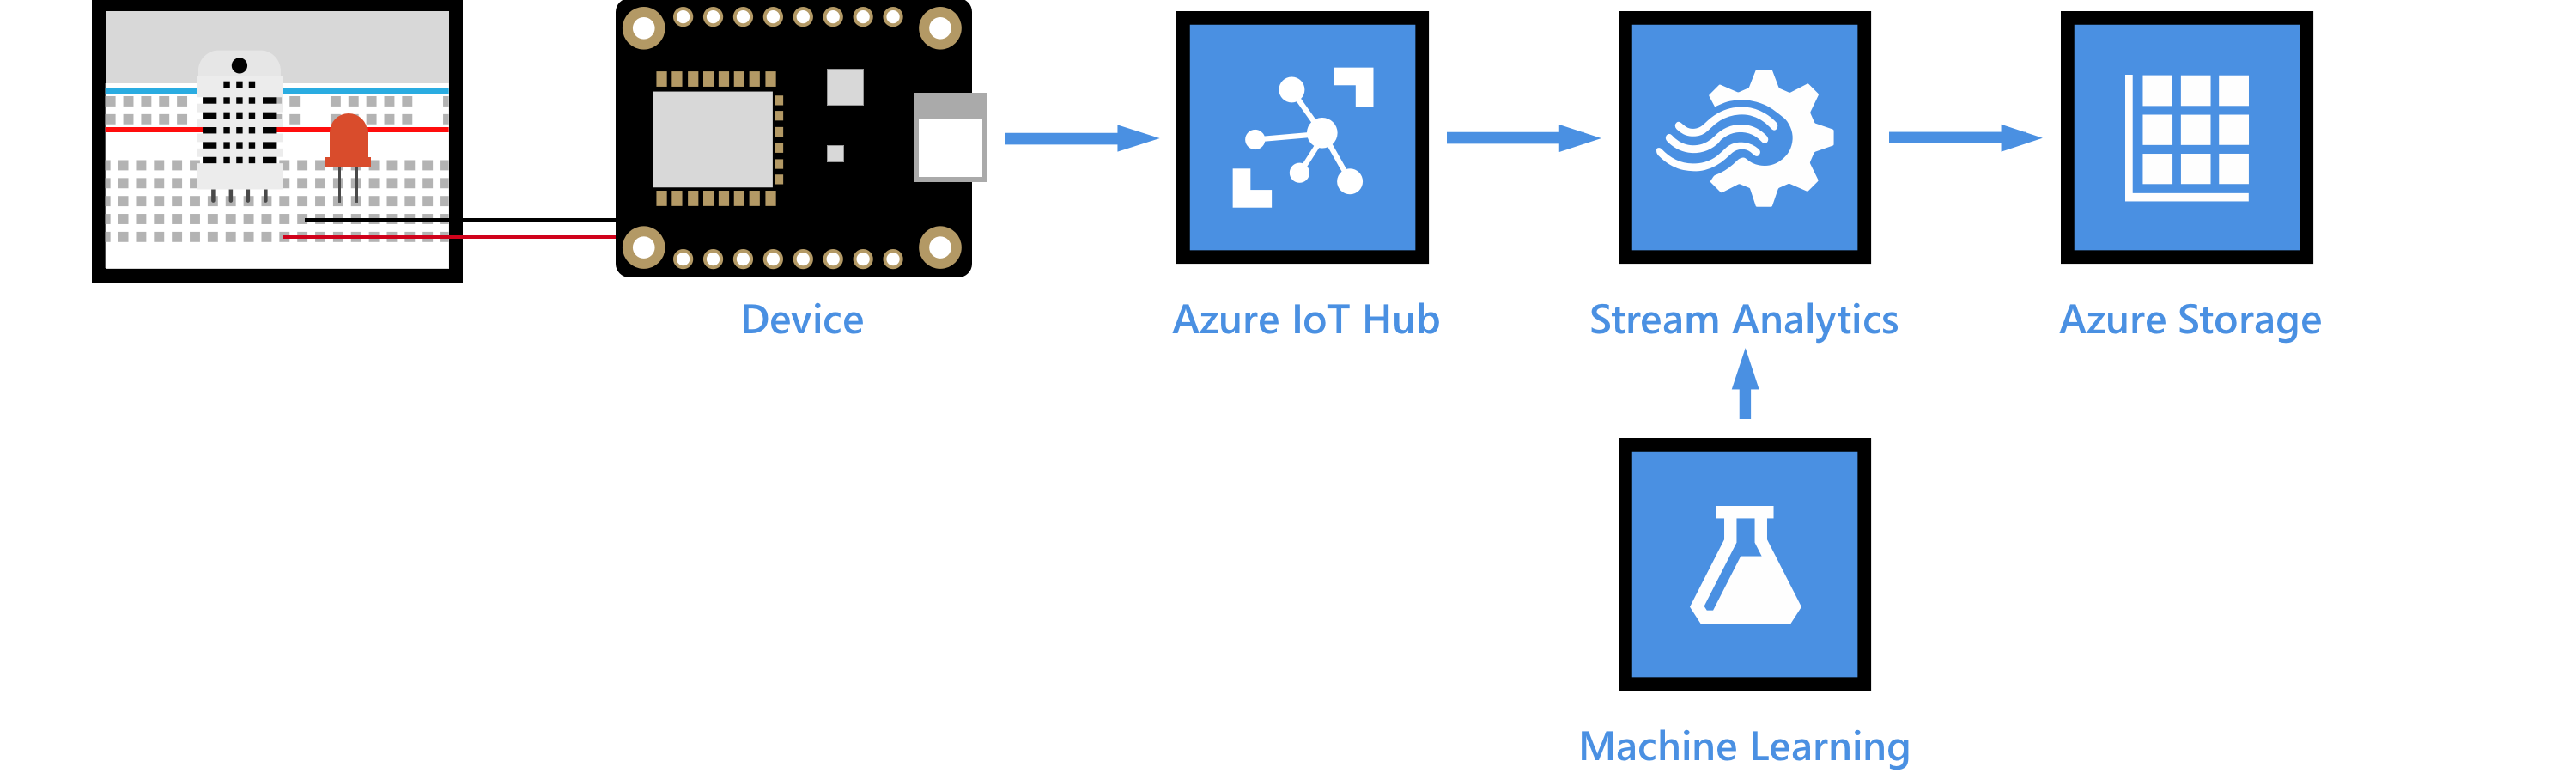
Weather forecast using the sensor data from your IoT hub in Azure Machine Learning
[!NOTE] Before you start this tutorial, make sure you’ve completed Setup your device. By Setup your device, you set up your IoT device and IoT hub, and deploy a sample application to run on your device. The application sends collected sensor data to your IoT hub.
Machine learning is a technique of data science that helps computers learn from existing data to forecast future behaviors, outcomes, and trends. Azure Machine Learning is a cloud predictive analytics service that makes it possible to quickly create and deploy predictive models as analytics solutions.
What you learn
You learn how to use Azure Machine Learning to do weather forecast (chance of rain) using the temperature and humidity data from your Azure IoT hub. The chance of rain is the output of a prepared weather prediction model. The model is built upon historic data to forecast chance of rain based on temperature and humidity.
What you do
- Deploy the weather prediction model as a web service.
- Get your IoT hub ready for data access by adding a consumer group.
- Create a Stream Analytics job and configure the job to:
- Read temperature and humidity data from your IoT hub.
- Call the web service to get the rain chance.
- Save the result to an Azure blob storage.
- Use Microsoft Azure Storage Explorer to view the weather forecast.
What you need
- Tutorial Setup your device completed which covers the following requirements:
- An active Azure subscription.
- An Azure IoT hub under your subscription.
- A client application that sends messages to your Azure IoT hub.
- An Azure Machine Learning Studio account. (Try Machine Learning Studio for free).
Deploy the weather prediction model as a web service
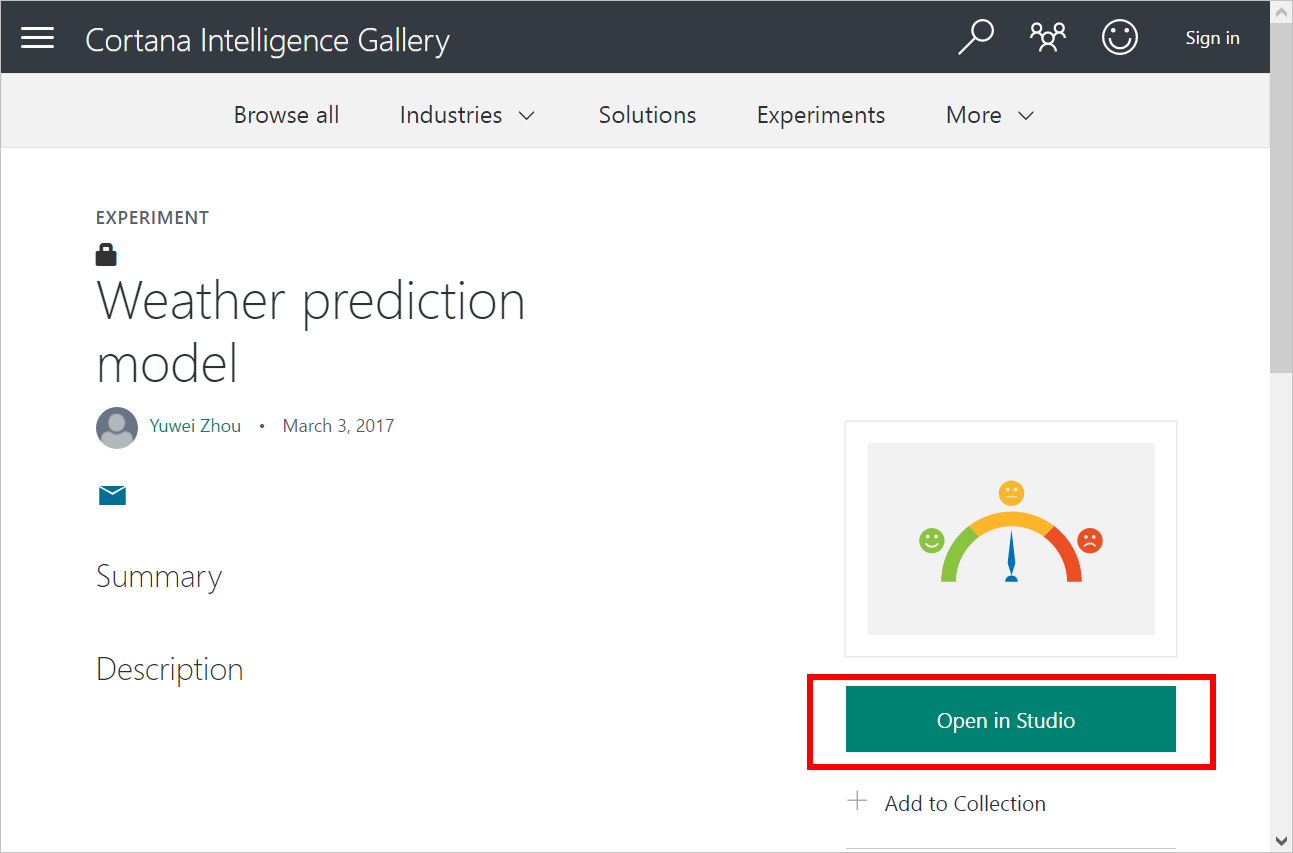
- Go to the weather prediction model page.
- Click Open in Studio in Microsoft Azure Machine Leaning Studio.
- Click Run to validate the steps in the model. This step might take 2 minutes to complete.
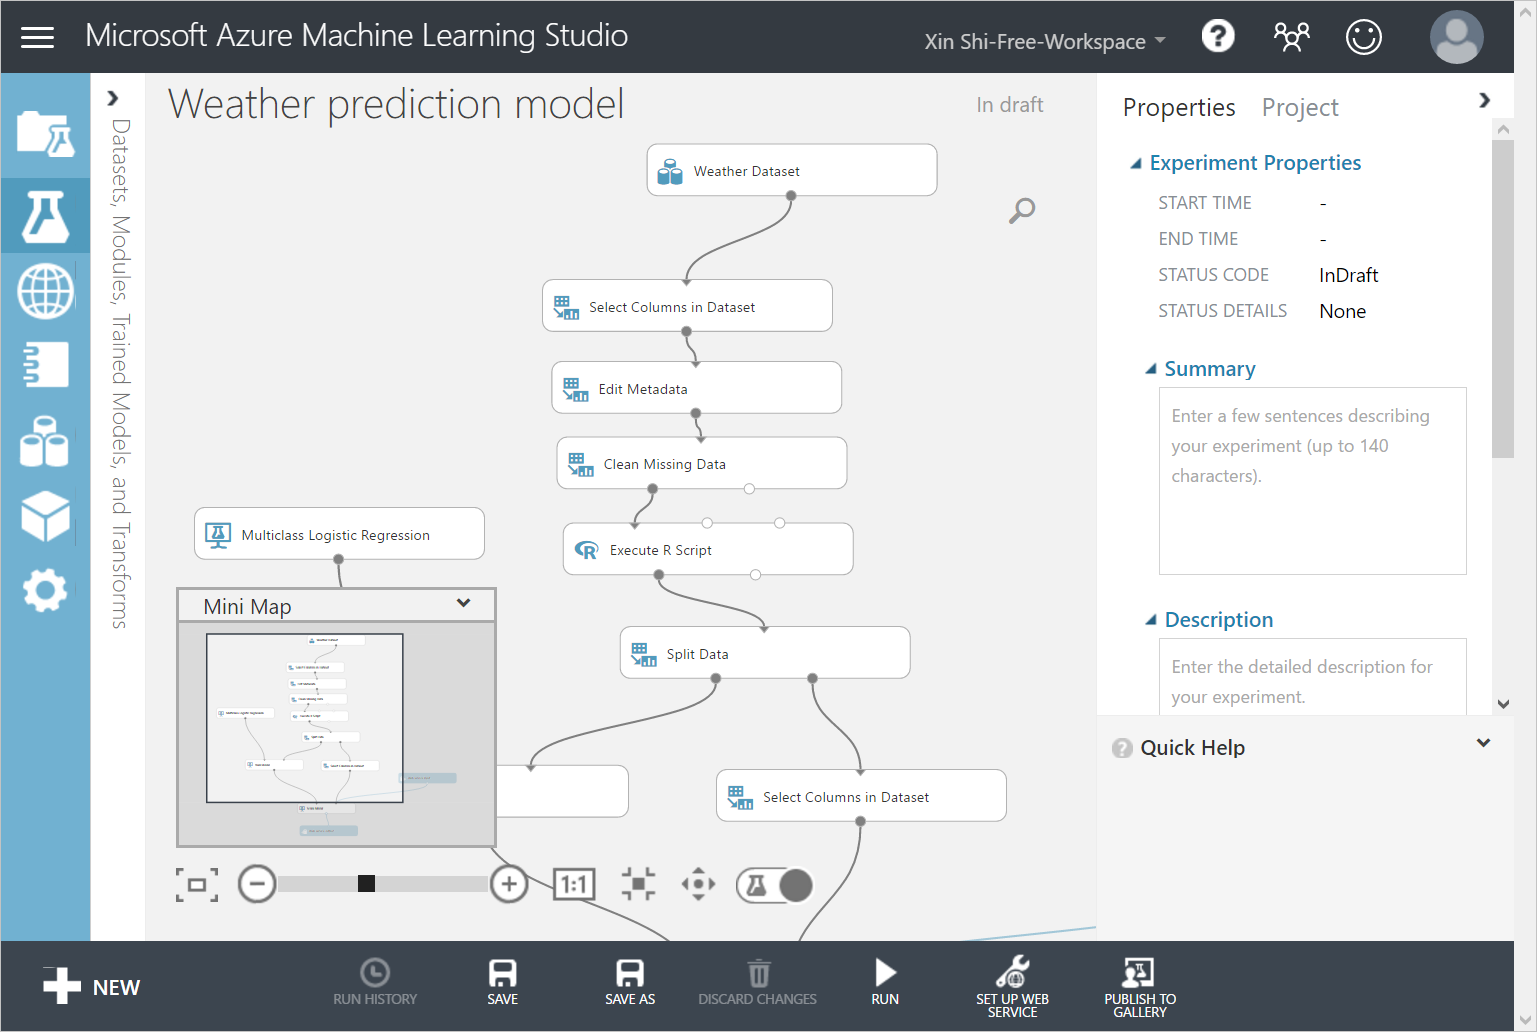
- Click SET UP WEB SERVICE > Predictive Web Service.
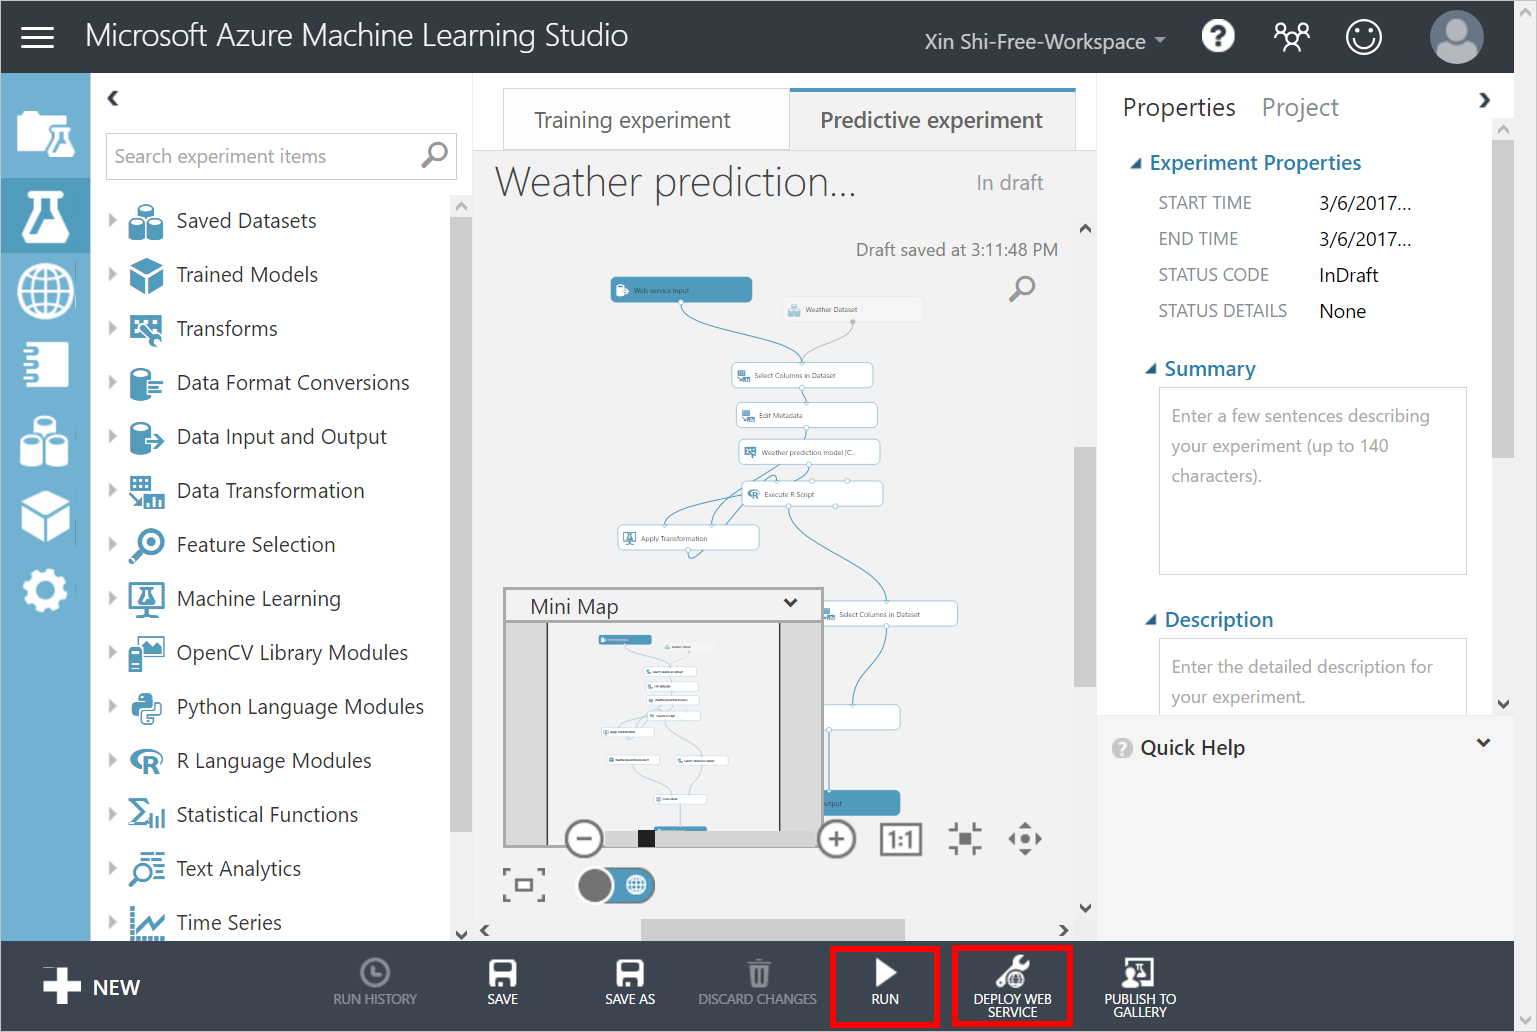
- In the diagram, drag the Web service input module somewhere near the Score Model module.
- Connect the Web service input module to the Score Model module.

- Click RUN to validate the steps in the model.
- Click DEPLOY WEB SERVICE to deploy the model as a web service.
On the dashboard of the model, download the Excel 2010 or earlier workbook for REQUEST/RESPONSE.
[!Note] Ensure that you download the Excel 2010 or earlier workbook even if you are running a later version of Excel on your computer.
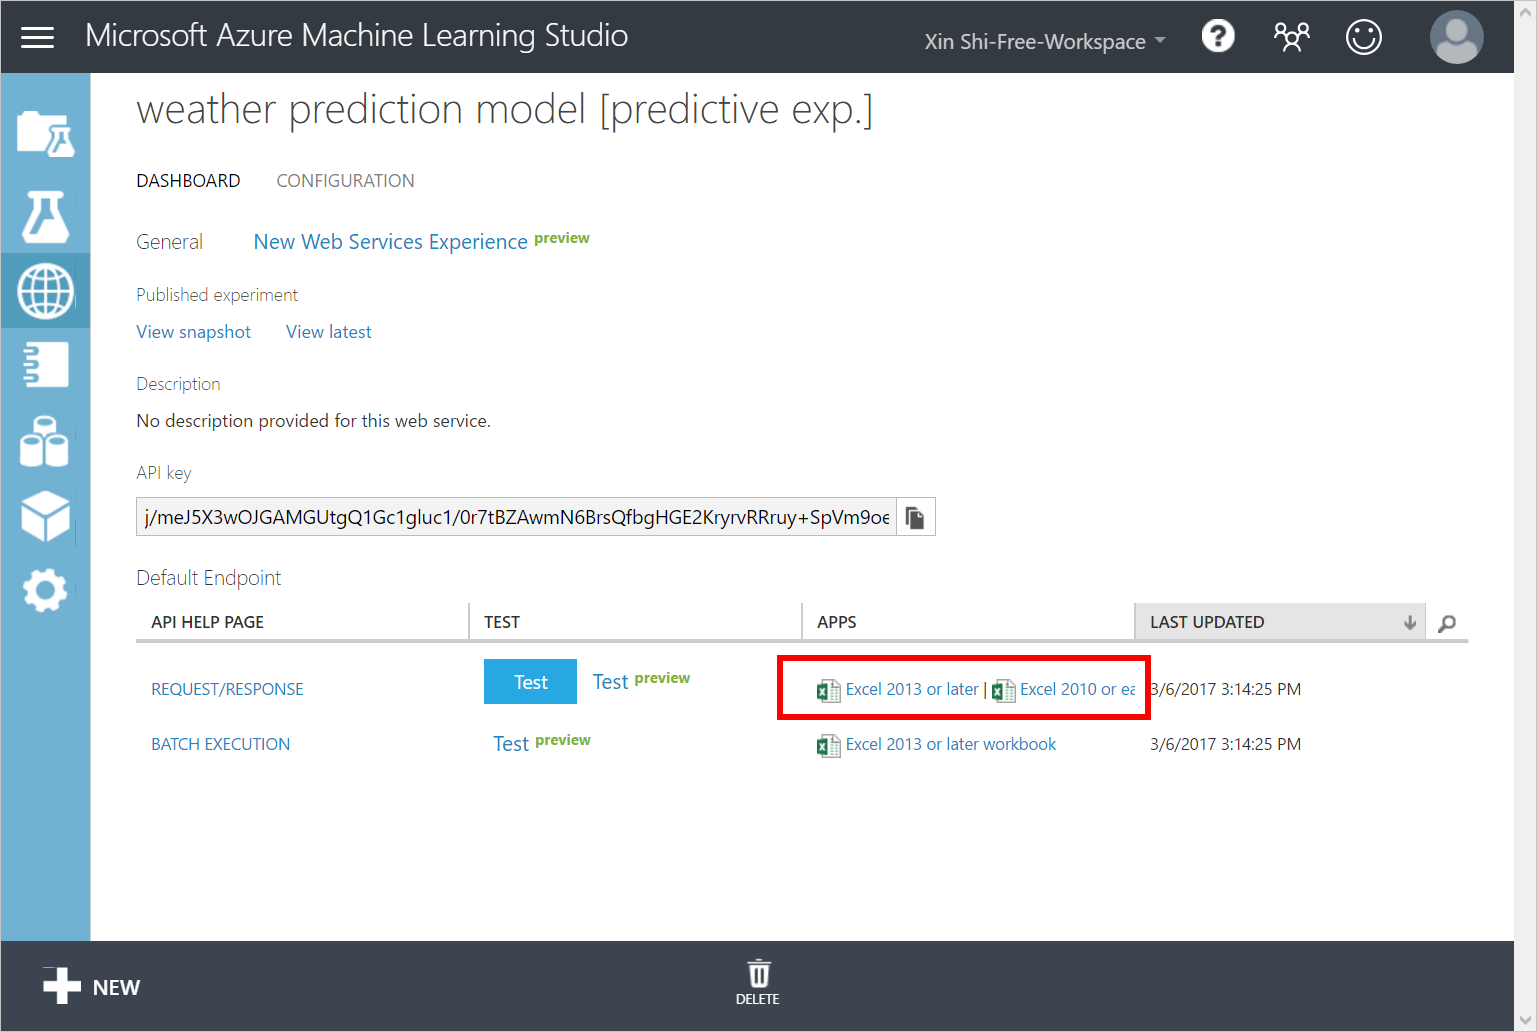
Open the Excel workbook, make a note of the WEB SERVICE URL and ACCESS KEY.
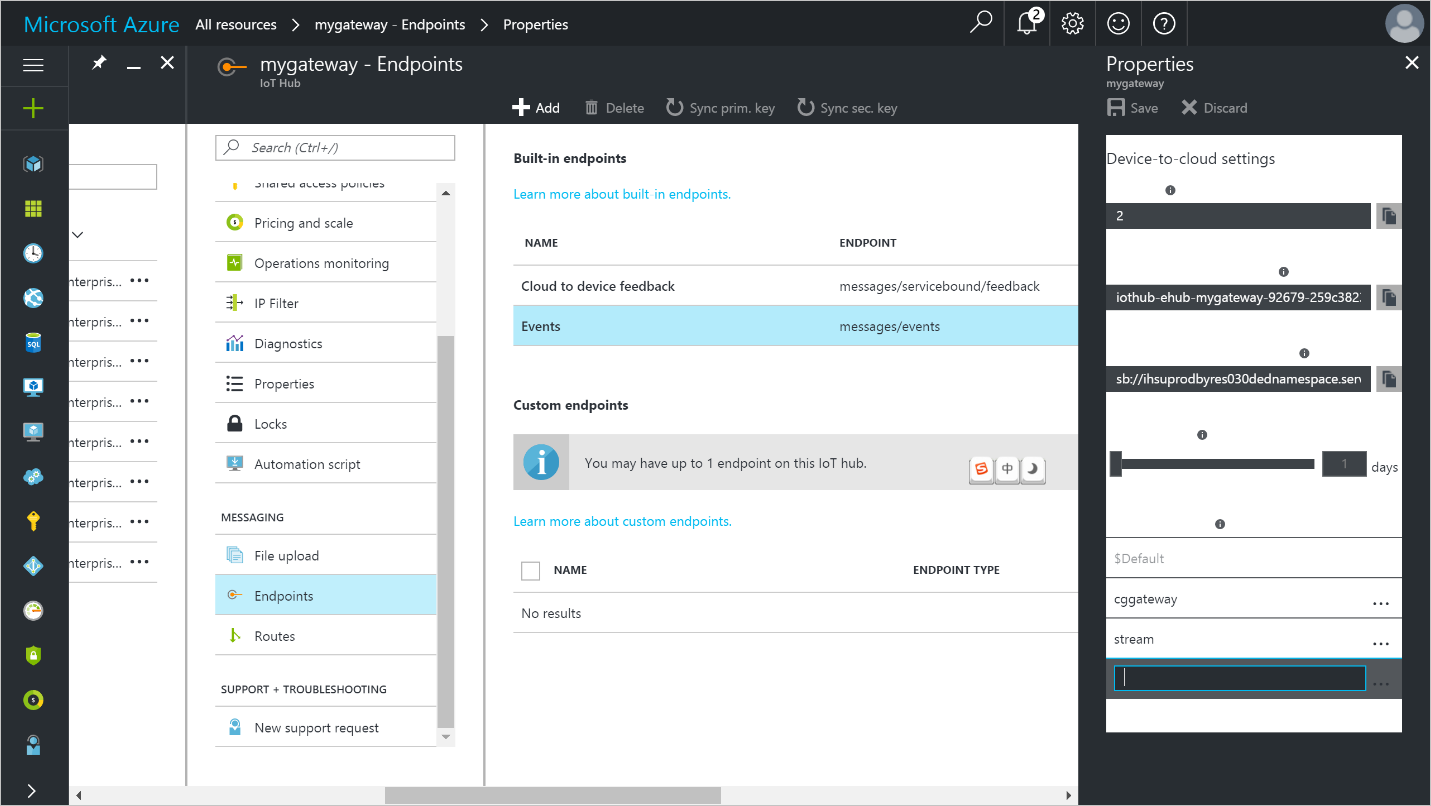
Add a consumer group to your IoT hub
Consumer groups are used by applications to pull data from Azure IoT Hub. In this lesson, you create a consumer group to be used by a coming Azure service to read data from your IoT hub.
To add a consumer group to your IoT hub, follow these steps:
- In the Azure portal, open your IoT hub.
Click Endpoints on the left pane, select Events on the middle pane, enter a name under Consumer groups on the right pane, and then click Save.
Create, configure, and run a Stream Analytics job
Create a Stream Analytics job
- In the Azure portal, click New > Internet of Things > Stream Analytics job.
Enter the following information for the job.
Job name: The name of the job. The name must be globally unique.
Resource group: Use the same resource group that your IoT hub uses.
Location: Use the same location as your resource group.
Pin to dashboard: Check this option for easy access to your IoT hub from the dashboard.
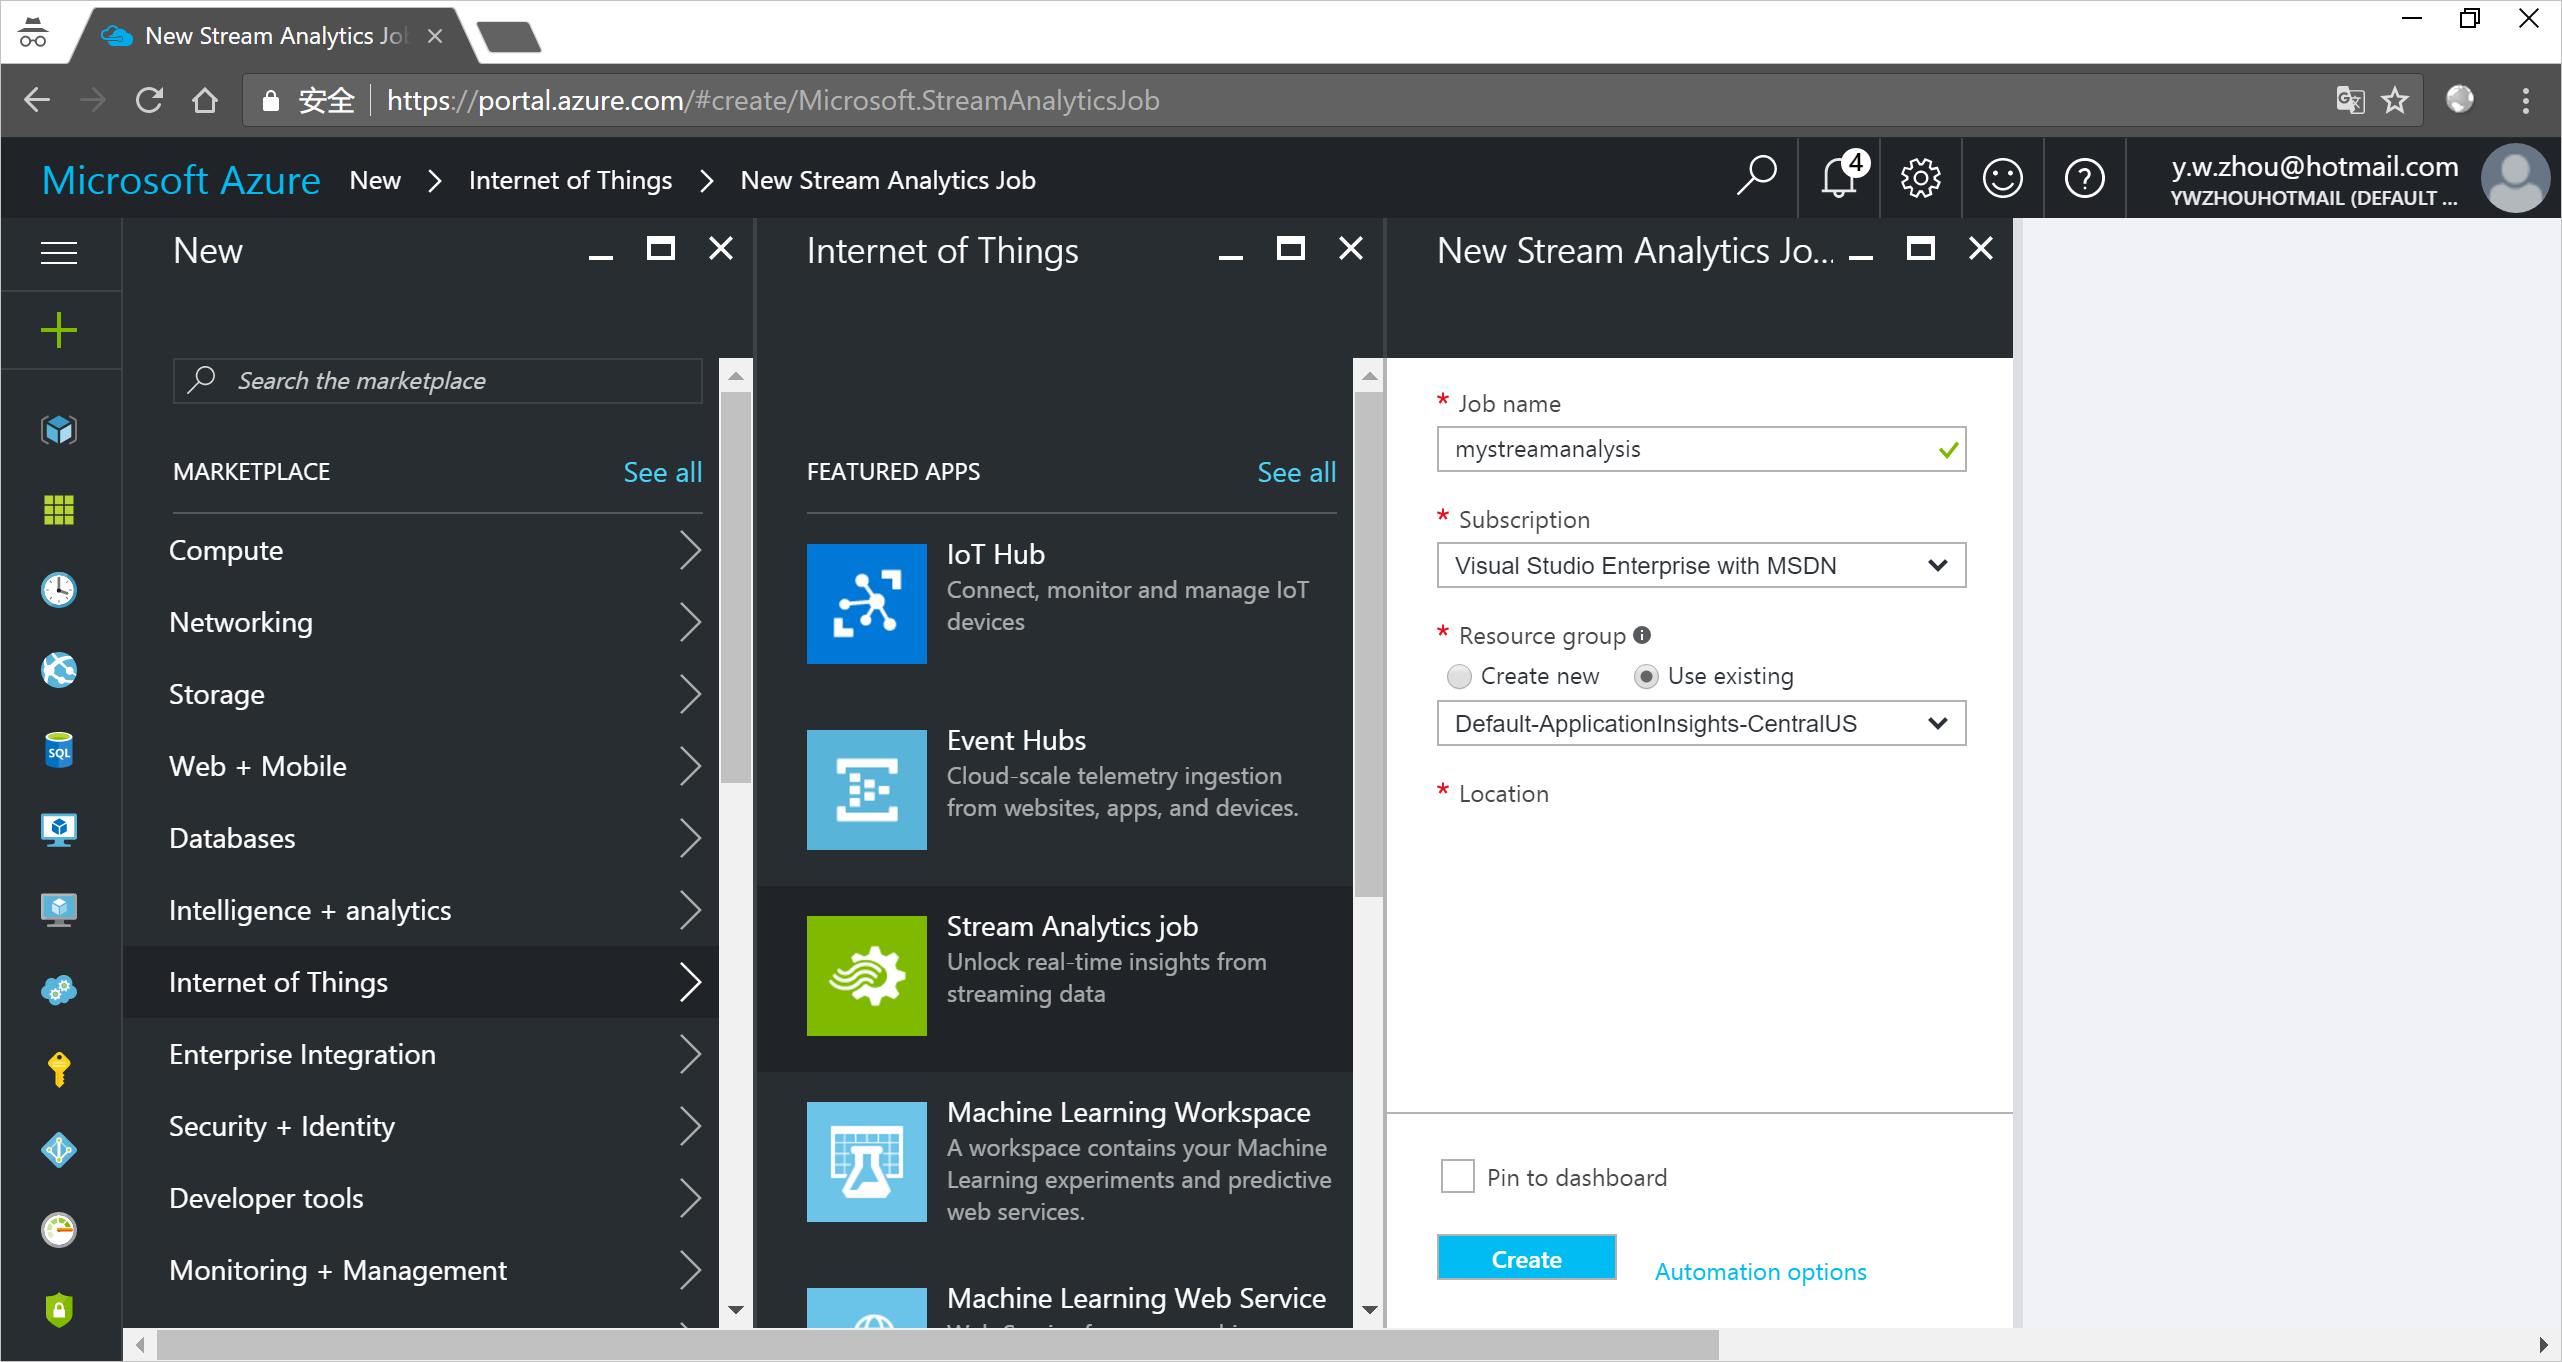
Click Create.
Add an input to the Stream Analytics job
- Open the Stream Analytics job.
- Under Job Topology, click Inputs.
In the Inputs pane, click Add, and then enter the following information:
Input alias: The unique alias for the input.
Source: Select IoT hub.
Consumer group: Select the consumer group you created.
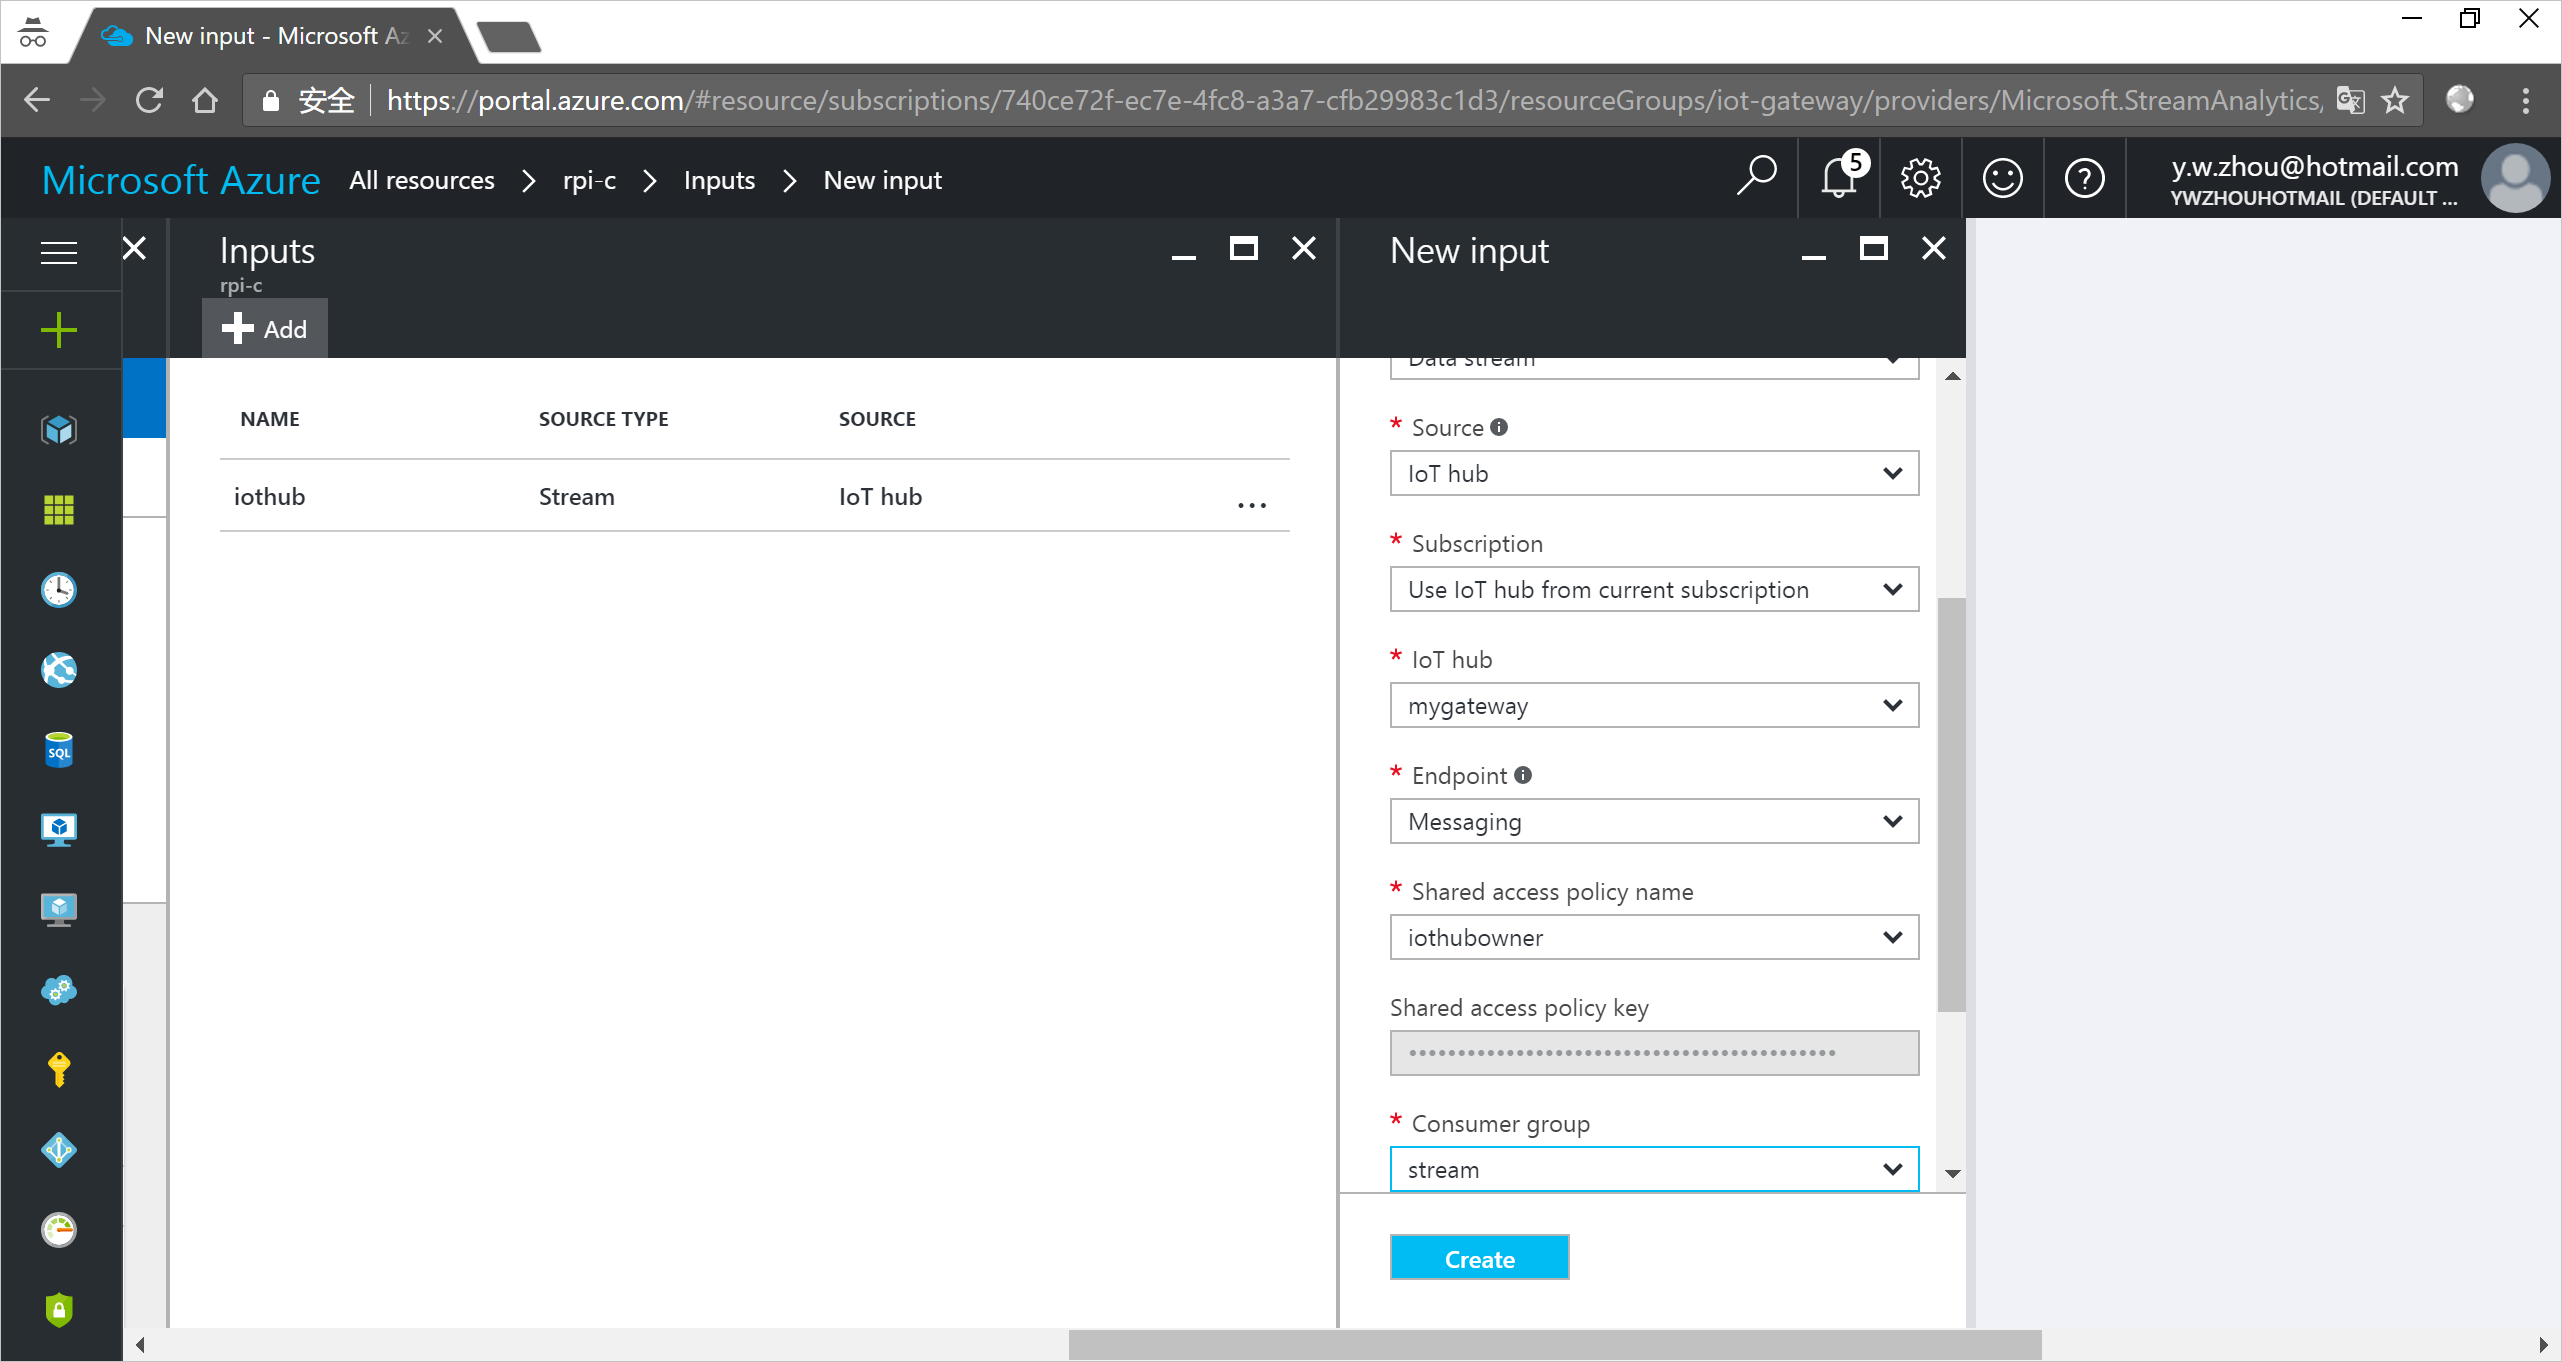
Click Create.
Add an output to the Stream Analytics job
- Under Job Topology, click Outputs.
In the Outputs pane, click Add, and then enter the following information:
Output alias: The unique alias for the output.
Sink: Select Blob Storage.
Storage account: The storage account for your blob storage. You can create a storage account or use an existing one.
Container: The container where the blob is saved. You can create a container or use an existing one.
Event serialization format: Select CSV.
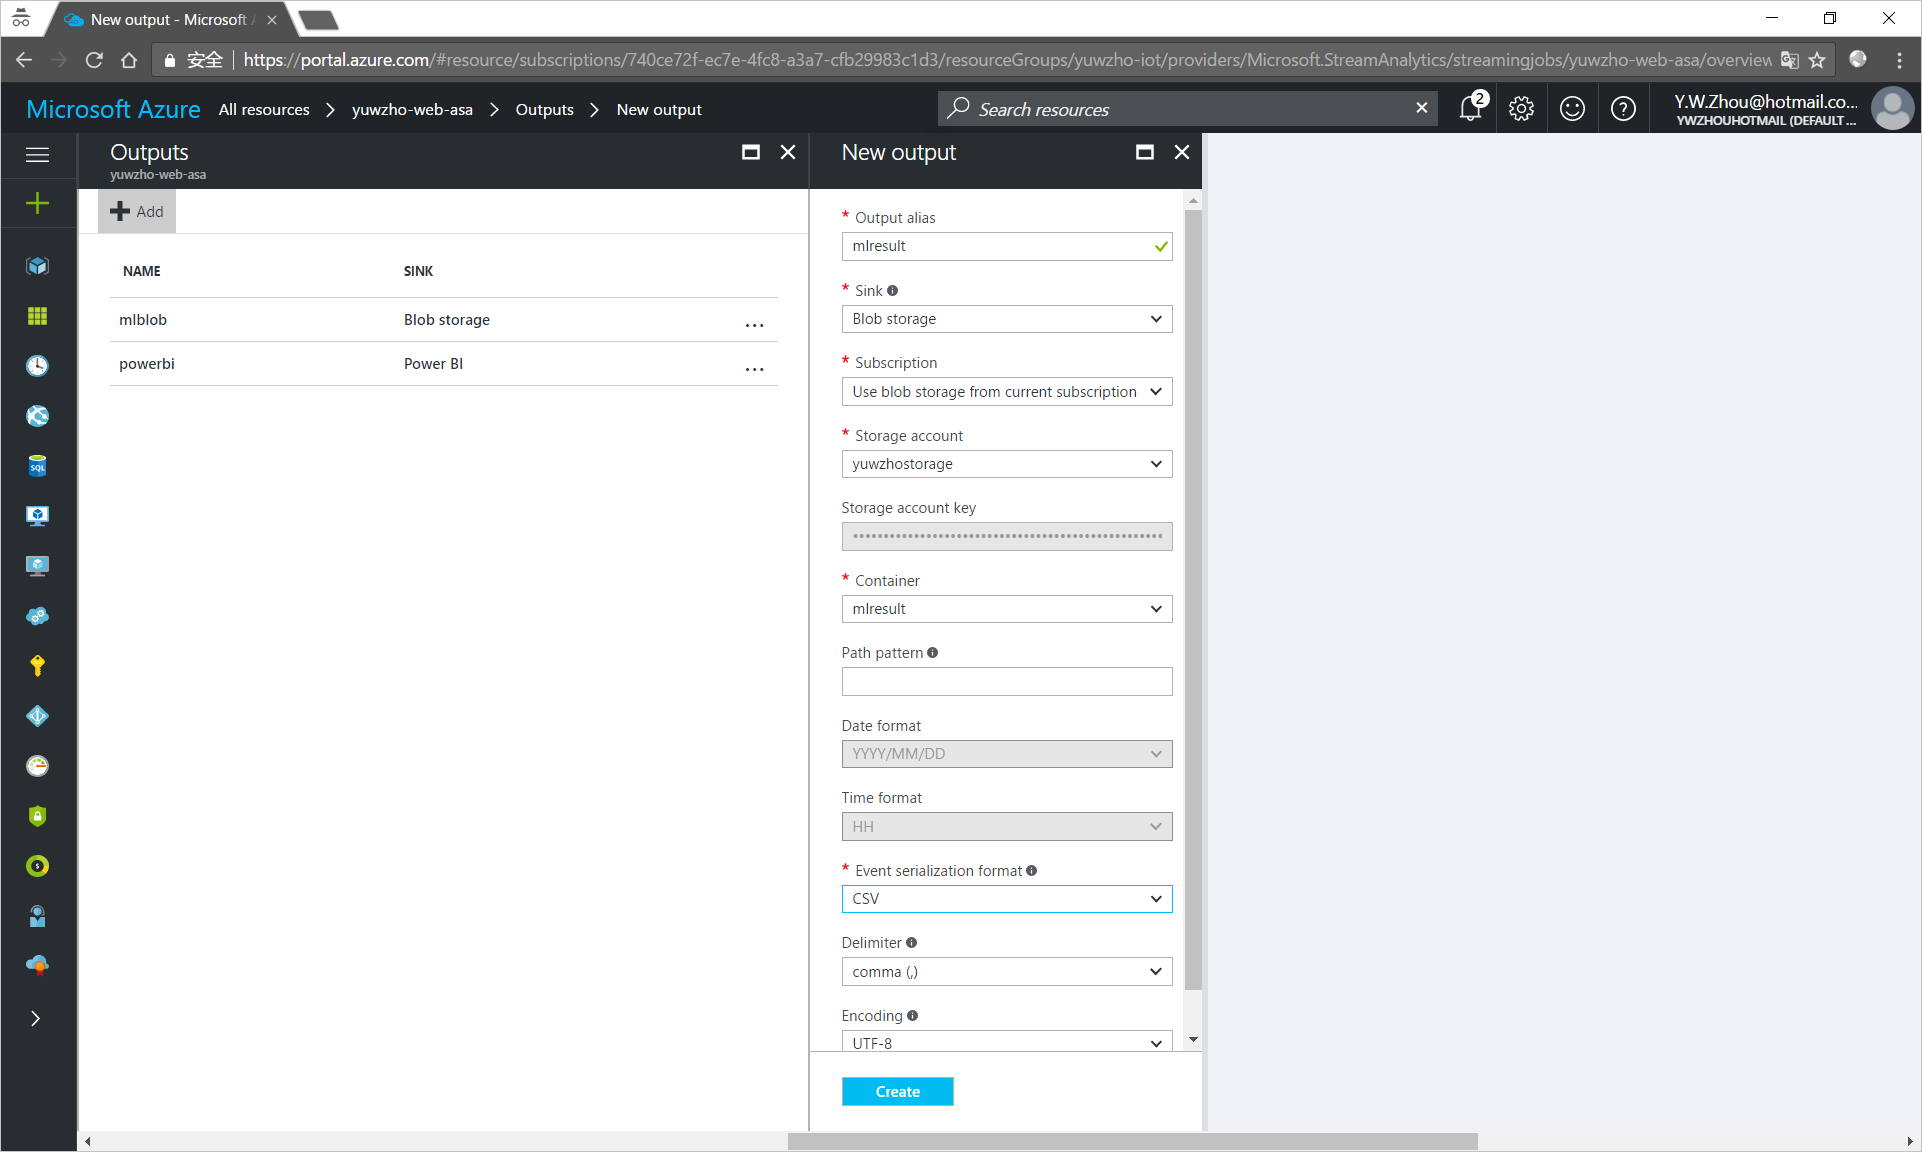
Click Create.
Add a function to the Stream Analytics job to call the web service you deployed
- Under Job Topology, click Functions > Add.
Enter the following information:
Function Alias: Enter
machinelearning.Function Type: Select Azure ML.
Import option: Select Import from a different subscription.
URL: Enter the WEB SERVICE URL that you noted down from the Excel workbook.
Key: Enter the ACCESS KEY that you noted down from the Excel workbook.
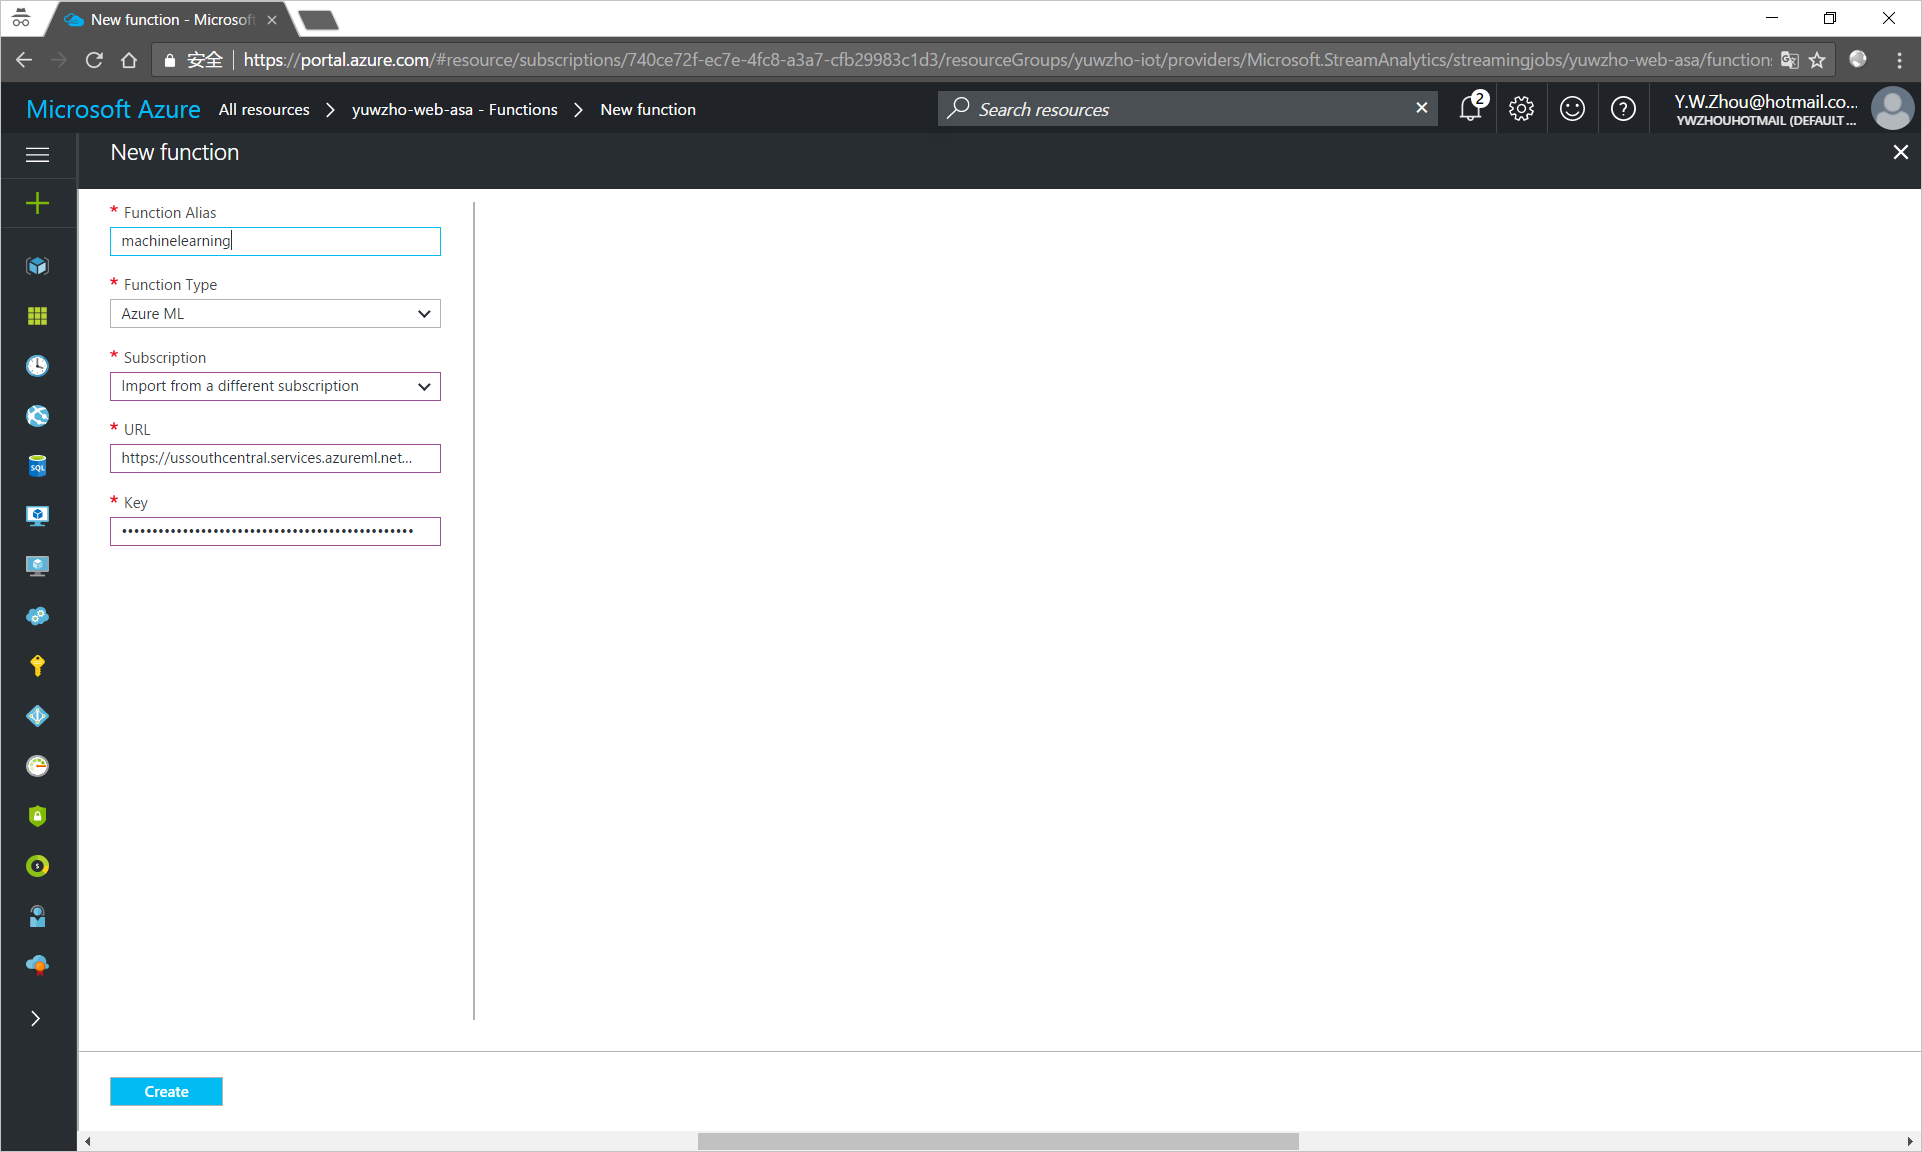
Click Create.
Configure the query of the Stream Analytics job
- Under Job Topology, click Query.
Replace the existing code with the following code:
WITH machinelearning AS (
   SELECT EventEnqueuedUtcTime, temperature, humidity, machinelearning(temperature, humidity) as result from [YourInputAlias]
)
Select System.Timestamp time, CAST (result.[temperature] AS FLOAT) AS temperature, CAST (result.[humidity] AS FLOAT) AS humidity, CAST (result.[Scored Probabilities] AS FLOAT ) AS 'probabalities of rain'
Into [YourOutputAlias]
From machinelearning
Replace
[YourInputAlias]with the input alias of the job.Replace
[YourOutputAlias]with the output alias of the job.Click Save.
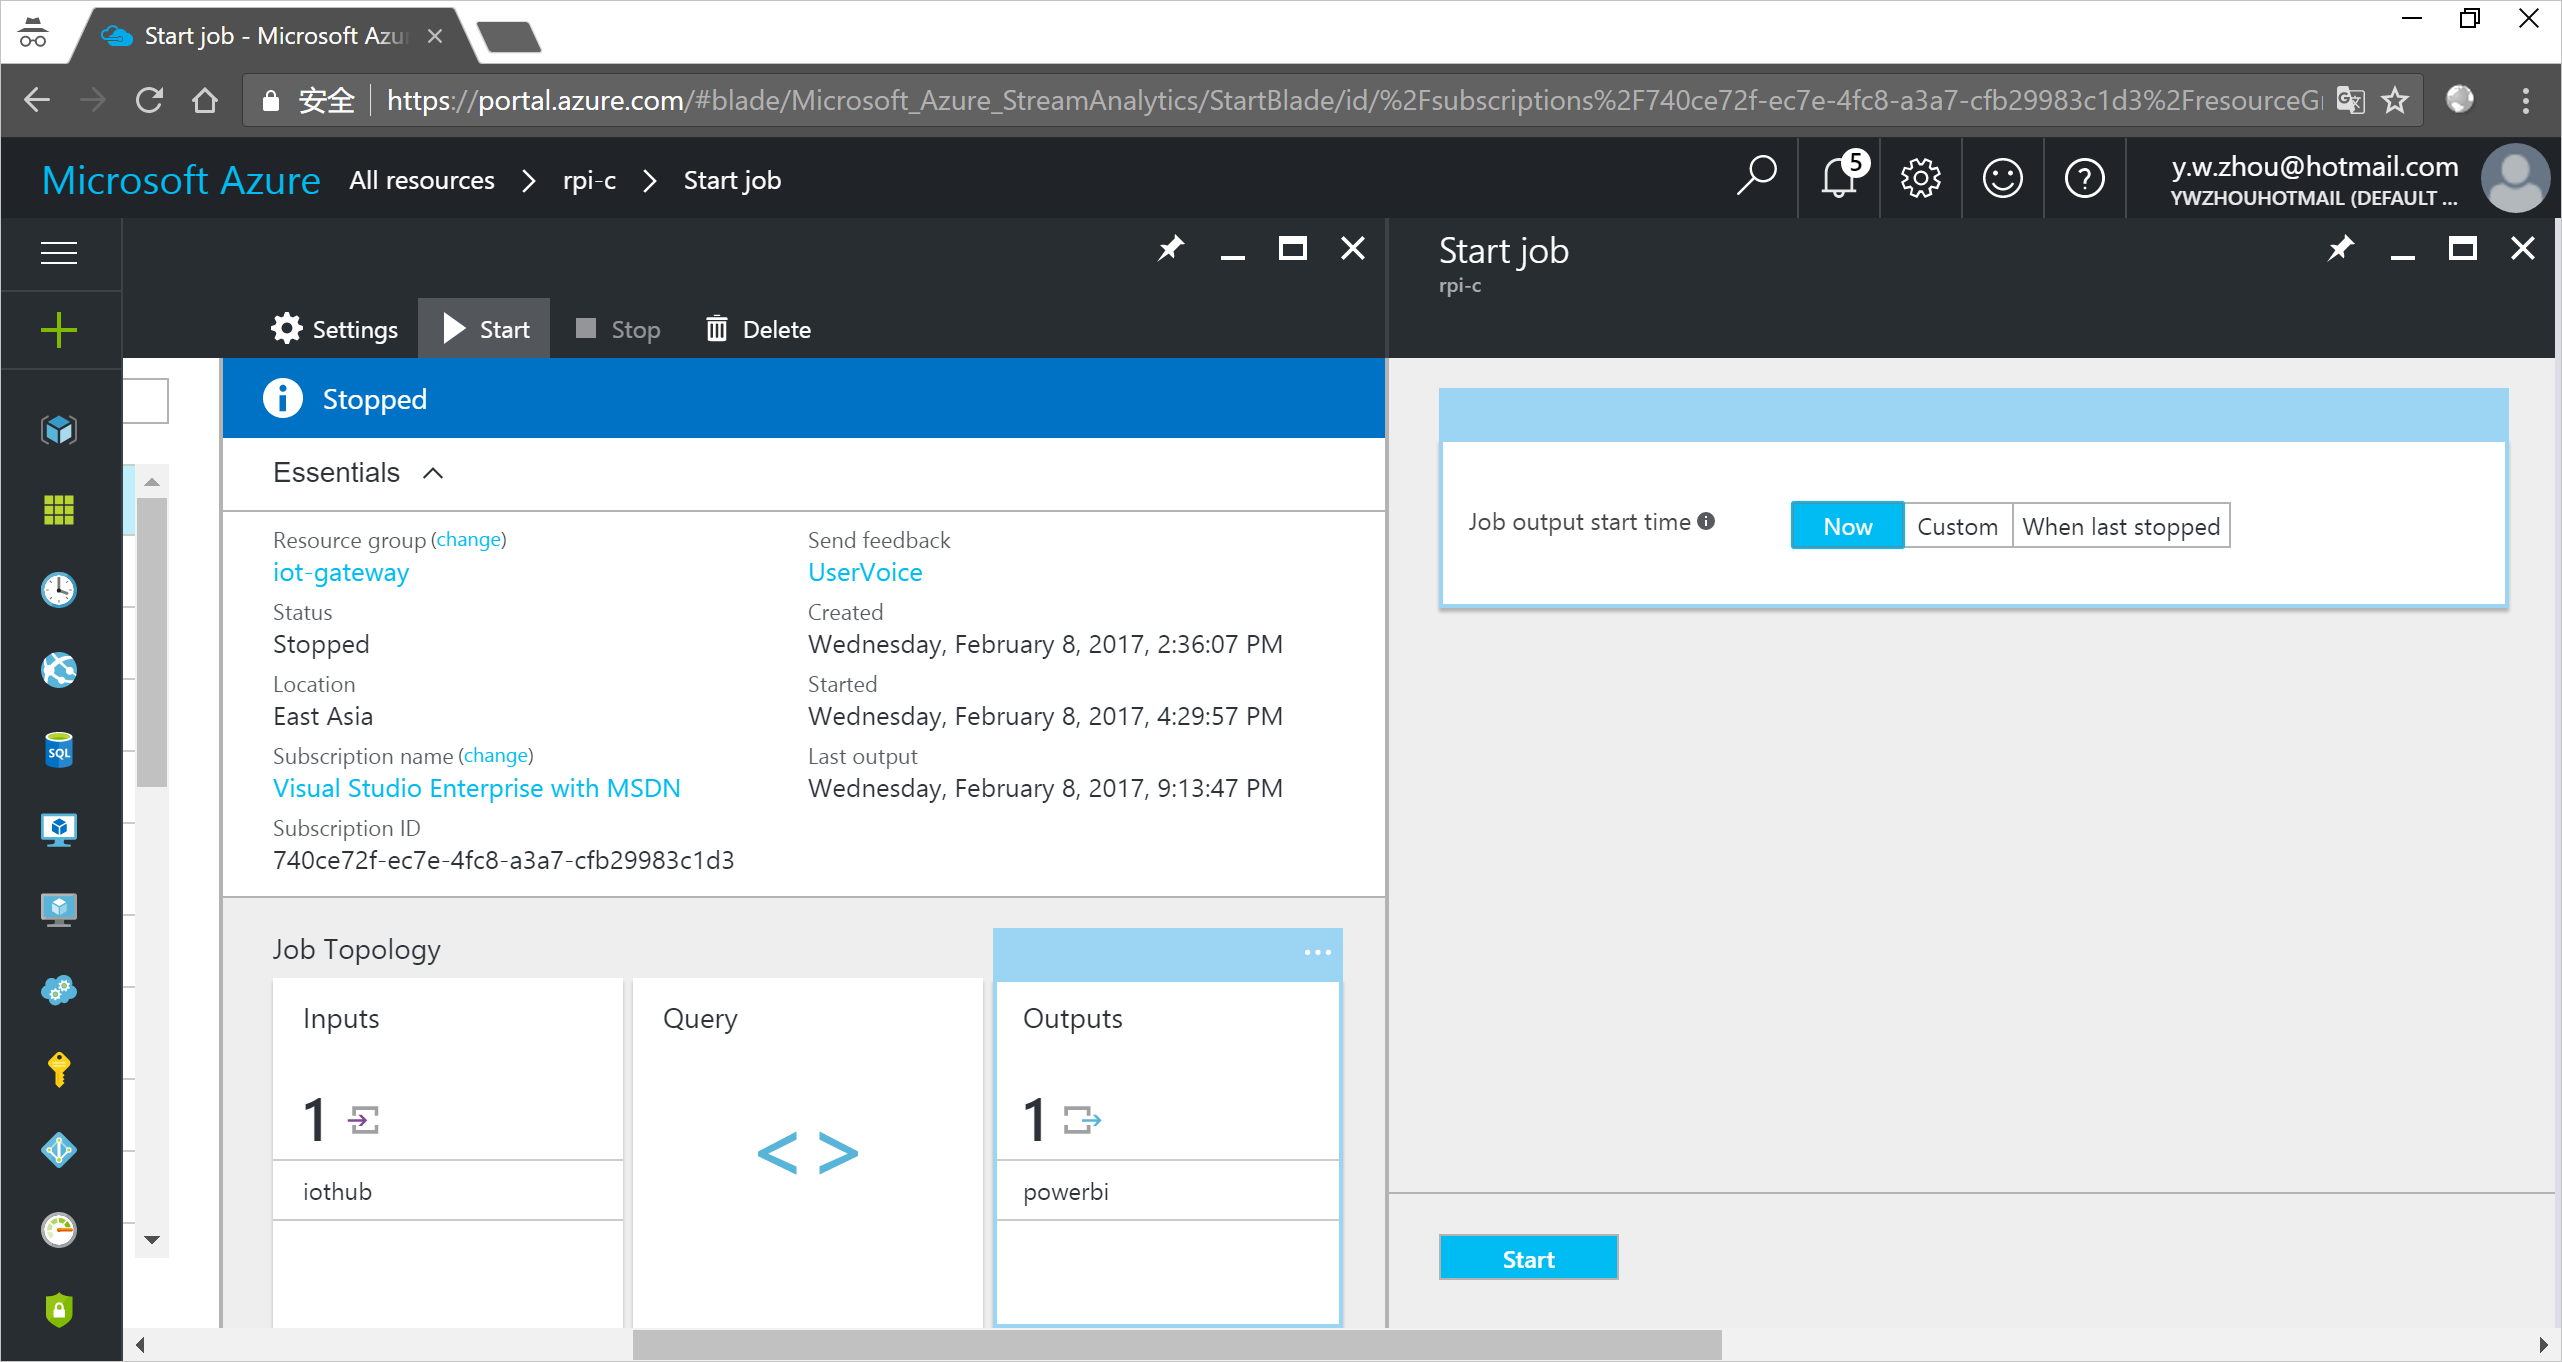
Run the Stream Analytics job
In the Stream Analytics job, click Start > Now > Start. Once the job successfully starts, the job status changes from Stopped to Running.
Use Microsoft Azure Storage Explorer to view the weather forecast
Run the client application to start collecting and sending temperature and humidity data to your IoT hub. For each message that your IoT hub receives, the Stream Analytics job calls the weather forecast web service to produce the chance of rain. The result is then saved to your Azure blob storage. Azure Storage Explorer is a tool that you can use to view the result.
- Download and install Microsoft Azure Storage Explorer.
- Open Azure Storage Explorer.
- Sign in to your Azure account.
- Select your subscription.
- Click your subscription > Storage Accounts > your storage account > Blob Containers > your container.
Open a .csv file to see the result. The last column records the chance of rain.

Summary
You’ve successfully used Azure Machine Learning to produce the chance of rain based on the temperature and humidity data that your IoT hub receives.